Business Hours

Sunday Closed
Monday 8:00 AM to 5:00 PM
Tuesday 8:00 AM to 5:00 PM
Wednesday 8:00 AM to 5:00 PM
Thursday 8:00 AM to 5:00 PM
Friday 8:00 AM to 5:00 PM
Saturday Closed

April 2019

Cajun Classic National Enduro 2019

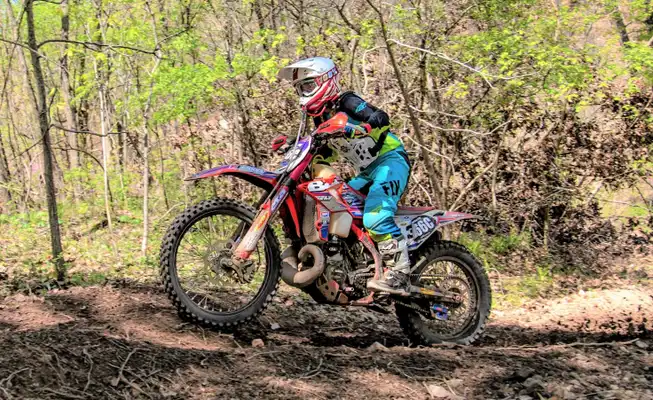
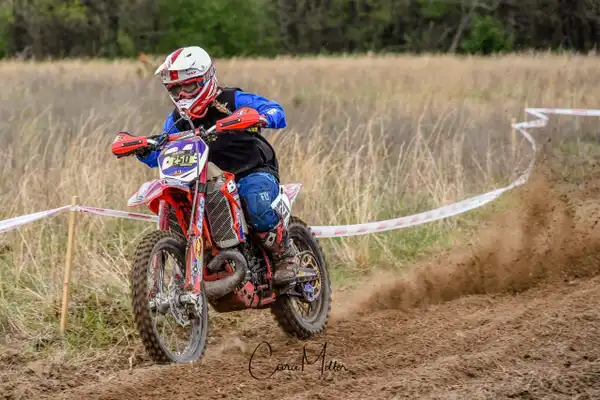
Cajun Classic National Enduro 2019 Round 3 of the NEPG took place in Forest Hill, LA. I have never been there before but had heard it was mostly dirt with some sand washes. The rain was on the light side the week before and made conditions near perfect. The temperatures were on the hot side compared to what it is in Mid Missouri still. We had a transfer to get to the first test. On the side of the trail was a bear growling at oncoming racers!! When you are on a bike, things look different and it was believable for a split second, lol. It was just a dude in a bear suit. The first test was one of the shorter ones. In the first few miles, I wrecked and tweaked my front end. I could not get it fixed myself so I had to ride it as is until I finished the test. I shook it off and tried to not let a crooked front end bother me. Before the start of test two, I had my dad fix it. I was all set and pumped up. Within the first few miles, another issue had arrived. Coming out of a fast corner, I spotted what looked like to be a deep mud rut. One that a person could get stuck in. I tried to go around it and went to the high side. Something grabbed my front end and stopped my momentum resulting in my rear end following into the rut, just great. I tried to keep my front out of it but it eventually fell in. IT WAS DEEP! Well above my pegs, chain, sprockets. I tried wiggling, lifting, looking for sticks, pretty much anything a “calm” person could do when stuck. Anytime, a bike came up I directed them where to go around. I spotted Steve Leivan and did not expect him to stop but he did. I guess he was not having a great day, either. It took the both of us to lift the front end out and get the rear out. That incident I lost 5+ minutes. It happens though and my number one priority was to stay positive! Right after the mud hole, was a sand wash. It was fun but because I was all wet from rolling around in the mud, all the sand stuck to me and that was horrible all day long. I finished that test about as strong as I could. Test 3 and 4 flowed pretty good compared to some of the others. I just spent a ton of time wrecking and hitting trees. Not sure why, but could not seem to keep it on two wheels. Still trying to be positive about the not going so well race, I went into the last test, with a good attitude and ready to attack the 11 miles. I started out really strong but just like the rest of the day I wrecked a lot. A few miles in there was a huge rock boulder section and when I got to it there was a few people laying in it resulting in me not getting a good run at it and some mess up. Then it started to flow good again with some more fast sand washes. The last two miles were hell, lots of logs and tight trees barely wide enough for bars to go through with tons of tight corners to maneuver. I was glad to be done after that! After a so, so day, I was not really pleased with my riding. I finished 5th in Womens Elite. Great job to the other Bonecutter Off Road Riders!! Broc French – A 200 with a solid 2nd place seconds shy from 1st (Beta) Jacob Hyatt – Had a bad mishap in the first test resulting in an injury Scott Boyer – A+40 3rd (Beta) Steve Bonecutter – A+50 12th (Beta) Tayler Bonecutter – Womens Elite 5th (Beta) Action Shot P/C: Shan Moore More Posts Back To Blog Page

Cajun Classic National Enduro 2019 Read More »

Wrench Tip Wednesday: Tire Selection

Wrench Tip Wednesday: Tire Selection Choosing a tire may be one of the toughest things to do in the dirt bike world. There are so many factors that go into it. What terrain are you riding? What is your bikes’ main purpose? Soft, gummy, hard? Knobby or trials? Previous personal preference? What about size? Tire choice can make or break your day as it’s a big factor on whether you will be enjoying the ride. Dual sport bikes are used for both off road and street riding. The tire must be DOT approved. Lots of different brands and styles out there but take into consideration, are you riding more on the streets or off road. If its more off road then a knobby type dual sport tire is a good option. If you are spending more time on the street or at high speeds, a sportier tire is a good choice. Motocross is a track with jumps and other man-made obstacles. Tire choices seem to be somewhat similar to some off road terrains. Soft, loamy dirt, sand, and mud most riders prefer a harder compound rubber tire with taller and wider spaced knobs. When the terrain is firmer a softer compound with knobs closer together and shorter is preferred. Intermediate tires work well in most conditions, so that is a good all-around tire. Off road is a tough one, from tight single track to high-speed wide-open desert riding. Muddy and loamy conditions most riders go with a soft tire with wider and taller knobs. Overall, intermediate is the most popular. Gummy tires are a good choice for rock hell, hard enduro terrain, or extreme single track. But keep in mind, shredding the tire in a two hour harescramble is possible. That leaves the trials tire, when should you use a trials tire on a dirt bike, not a trials bike, that one is without a doubt personal preference but they do work well in rocks but hard to ride a grass track with one. Desert terrain can vary a lot from deep silt to a hard base and loads of rocks. My advice is to know where you are riding and the difference in terrain before selecting a tire. On a tire, there is three different numbers that give measurement of dimensions that all tires have. Example: 110/100-18. The first number is the width of the tire from sidewall to sidewall in millimeters. The second number is the sidewall height, also known as the aspect ratio that’s represented as a percentage of the tire width. The last number indicates rim size. A 19″ tire will only fit a 19″ rim. An 18” tire height will be very similar to the overall height of a 19” tire. Remember, the last number is the inner diameter, not outer diameter, and that inch of difference is made up in the sidewall height. You should be able to go with a different width and/or aspect ratio on the tire you choose but you can’t go with a different rim diameter. If you have a 19” rim, you have to go with a 19” tire. It comes down to personal preference and a matter of opinion. A 120 rear tire can make a poor handling bike feel even poorer. 120s are harder to roll over in turns and make the bike stand up more in ruts. They also have a tendency to push the front tire in flat corners, especially when the engine chugs into a turn at low rpm. However, for straight line acceleration, a 120 will put more rubber on the ground. Here is some information on our most popular tires and our favorites. The 505 Shinko Cheater Hybrid tire is excellent for hard enduro terrain and extreme single track. The soft sticky trials style rubber with a moto style carcass. This tire is good for where a trials tire falls short. It shines in dry, harder conditions. I put this tire on when I know there will be more rock than dirt. If it is half and half and wet conditions, I choose to run something different. The 525 Cheater is pretty much the same but with a different tread pattern. It shines in soft, loose loamy terrain. The Dunlop MX33 is soft to intermediate. This is a great all-around tire with enhanced handling and knob durability with more flex for superior grip. The front tire is directional. My dad and I both have been using the rear MX33 at almost all NEPG events we attend. It works well in mud, sand, rock, everything… it just works great! The Bridgestone M59 has wide tread blocks with a rounded profile offering a self-cleaning bite. This is a soft to intermediate tire. For the last 3 years, this is the only front tire the Bonecutter’s will run. It works that good! The Sedona MX907 is a hard-pack terrain tire. The cross-patch tread design provides a larger contact patch that will maximize both in-line and cornering traction. This tire has a rigid 4 ply carcass that enhances stability and helps absorb impacts. That is just a few of our favorites and most popular selling which means we keep them on the shelf. Lots of different ones out there and I am happy to discuss them! Remember, lots of things to consider before making a purchase. More Posts Back To Blog Page

Wrench Tip Wednesday: Tire Selection Read More »

Beta History

Beta History With being around for over a century, Beta is rich in history. Starting business in 1904, manufacturing bicycles. One family owned, 26 world championship titles, 4 revolutions in trials bikes, design of 4T enduro engines in 2009, 2T enduro bikes in 2013; Beta is not new to the industry. A key to overall success is keeping up the new trends, being attentive to signs of change, and willing to grow with it. Here is a lookback at some of my favorite key points in Betamotor history. In 1961, Beta developed a 3 speed 50 cc engine. By the early 70’s a 250 engine was developed, intended for motocross competition. Various versions were tested and ultimately Beta won a moto national racing title. In 1972, production was up to 30,000 units; 15,000 being engines. Mid to late 70’s, the Japs started to take over the moto scene with cheaper bikes. Beta decided their best interest was committing to off road; 1979 was the birth of trials bikes. Years of testing and fine tuning the trials engines, eventually led to Beta being on top of the scene. 1985-1999 Beta trials riders received 36 national titles and 8 world titles. This brings us to the time frame of the Beta/KTM agreement. Lots of correct and incorrect rumors floating around about this. In 1994, Beta was interested in purchasing the design of a 50cc engine with six gears. At the time, Beta already had a 50cc engine with an automatic transmission, KTM took interest in this. Thus, the start of working together. Beta helped develop and assemble over 6,000 engines for 85cc and 105cc for KTM and Husqvarna. At the Betamotor factory, an assembly line was dedicated to the Austrian’s. The agreement with KTM gave Beta great training for the future. In 2004, another agreement was signed. The Austrian company would supply the Italian company exclusively with enduro engines of various displacements. KTM has never granted this with anyone else. It was a key factor for Beta to get their enduro models on the market. By 2009, Beta started making their own engine for 350CC and up. Beta and KTM worked together until 2016. The Italians took interest in the U.S. market in 2004, previously only concentrating on trials machines. Tim Pilg was the lucky entrepreneur to become the Beta importer and owner of Beta USA. A dramatic rise in sales made the United States one of the most important for Betamotor in Italy. By 2010, Beta was still best known in the trials world but the enduro market was increasing, rapidly. The company dedicated effort into the new line and offered four stroke engines ranging from 350 to 525cc, produced in house. In 2012, the two stroke 250 and 300 engines were launched. The new RR two stroke range was available to the public in 2013, this was to be just the beginning. In 2014, Betamotor’s new product was the Xtrainer 300, compact, lightweight with maximum usability. This unit reached the United States, May 2015. The Xtrainer was my first Beta dirt bike. I learned tons on it and was able to get the start of my speed increase from it. The bike was similar to a tractor and would make it up any hill, a very mellow two stroke, but could get up and go if desired. I put 250 hours on mine before getting a 250cc and it is still going strong for the new owner with 300+ hours. Also in 2015, four strokes became EFI (Electronic Fuel Injected), no longer carbureted. Still no change of development pace for Beta. Next up is the building of a 125 engine. Beta has a wide range of endure models, from the easy and manageable 125 two stroke to the 480 four stroke for the more fit and experienced riders. The new well designed 2018 model range was developed with feedback from Steve Holcombe and Alex Salvini. The bikes lost weight and technical modifications to the engines. Once again after the new generation or RR, Race Editions, and RR-S models was finished, Beta went back to the drawing table. The RR-S models were designed to be able to go on the street coming already set up with blinkers and mirrors. The RR is Beta’s basic model. The Race Editions comes with different decals, closed cartridge forks, and a few bling items. Next up, a well sought-after size, the 200 RR! It officially arrived to the states late January 2019 and is expected to do well. Beta is on top of the world with 2 back to back world championships in the E3 class by Steve Holcombe, Junior title with Brad Freeman, along with Betamotor taking the Constructor’s title. Opening round of the World Enduro Series, Beta is still on top! There is so much more history than what I have stated but that is what I found the most interesting about the handcrafted Italian beauty. My Beta bike choice is a 250 Race Edition, the power is controllable but still there when you want to go fast. The bike is smooth, holds up well, and obviously the looks are out of this world! I have been riding/racing Beta’s four years now and plan to stick with the brand! Over the years, I have never worried about part availability and the public should not be scared of that either. I do a lot of back to back race weekends, ride enough to put 200 hours on a bike in a years’ time, and sometimes break shit. We (Bonecutter Off Road) keep anything we have ever broke on hand because we understand the importance of not being down long. If a person keeps the machine well maintained, nothing should drastically go wrong. Another complaint I hear often about Beta is no kickstarts on ‘18+. A kickstart can be easily added if absolutely desired but Beta has the starter motor figured out. A good battery and the bike will start with no issues. So,

Beta History Read More »

The Off Road Cup – 9 Hours of Racing

The Off Road Cup – 9 Hours of Racing The 9th annual off-road cup took place this past weekend in Wyandotte, OK. It is a 9-hour race, 3 “man” team with the option of ironman or ironwomaning it. A 2 “man” team was also allowed. The weather could have not been more perfect, sunny skies and 70’s! Trail conditions were the best possible since I started doing this race. When I think of D-Day Adventure Park, I think lots of ROCKS, it is almost like they grow them for fun. What little dirt there is generally gets rutted from the constant beating of bikes within 9 hours. The properties main use is for paintball. So, there are all kinds of cool things we get to ride through such as buildings and Styrofoam walls, which was my least favorite part. All kinds of army tanks and helicopters are also dispersed around the property. This year, I decided to do a family team with my brother and my dad. My mom came up with the team name, “Two Bone Heads & a Blonde” – it was a hit! My brother did the start; he was second into the woods. Family class starts after B class. Wyatt said that he had tons of passing to do in his first 3 laps on the leaf covered trail. My dad was up next, a lot of the loose rocks was out of the way at this point and the trail more open. I went last and did two consistent laps; trail was still a little sketchy. We continued in this order and kept battling with another family team. The next time I got to go out, I busted out some of my fastest times! I felt really good and the trail was for sure as good as it was going to get. The day seemed to go really fast. I did a total of 6 laps, my brother did 11 laps, and my dad did 9 laps for a total of 26 laps and only 1 minute 24 seconds shy for 2nd place. Coming into the last two laps, the battle was on. My dad and the other team went out at the exact same time and after that second to last lap only 20 seconds separating. My dad pushed as hard as he could but the other team had more. Two Bone Heads & a Blonde finished the day with 3rd in Family and 11th overall. Since, my 6 laps did not satisfy my itch to ride, I put in a few hours on Sunday. I felt great and looking forward to getting back to NEPG racing. I have spent the last three weekends in Oklahoma and I am ready to get further south with a good dirt/sand combo. Louisiana is up next for me! Big thanks to everyone who supported the mobile store! After the race was over, we noticed our tube shelf was almost empty!! We are glad to help and appreciate the honest riders leaving money.Thanks to the MORE crew for the good times. Great job to all the Bonecutter Off Road riders and their teams!! P/C: Puremoto Photography & Up Close & Dirty Motorsports Photography More Posts Back To Blog Page

The Off Road Cup – 9 Hours of Racing Read More »

Wrench Tip Wednesday: Installing a Bib Mousse

Wrench Tip Wednesday: Installing a Bib Mousse One thing many people dread to do on their bike is changing tires or installing mousse tubes. If you are sweating, struggling or becoming fatigued in the process of mounting a mousse, you are not doing it correctly or at least in a beneficial way. Bonecutter Off Road does offer installation of a bib mousse for $10 plus the bib cost. To make life easier a good tire stand is recommended. We prefer Rabaconda. Also, at least four tire irons need to be handy. Then of course, a big bucket of lube. We us the 8lb pal of Plews/Edelmann tire mounting lubricant. Keep in mind there is many different techniques to change a bib mousse. As always, just like opinions, I understand everyone has their own way. Our method is based off of using a Rabaconda tire changer. For starters, the old tire needs to be removed. Get the wheel set up on the tire changer. Make sure the wheel is secure. The bead breaker on the Rabaconda is handy to help to assist in inserting 4 tire irons around a quarter section of the tire. Push your knee against the side of the tire that is opposite to the irons and pull the irons towards you. In return, the bead should start to pop off the rim. Flip the wheel over. Use the bead breaker to push down on the tire right above where the bead started to pop off of the other side. Now you can keep turning the wheel and press down with the bead breaker. The tire should be hanging on the upper bead that has not been dismounted yet. Pull the bead breaker as close as possible to rim and find a good spot to push down the side over rim to completely remove it. When it starts to come off, spin the wheel and use the bead breaker to push the tire the rest of the way off all around until it falls down. Tip: If the bead breaker starts slipping over the side of tire when trying to push over rim, keep turning and searching for a sweet spot where it finally gets the right grip and you can push the side down over rim. If you have a rim lock, you can push the link on the Rabaconda bread breaker up so that it pushes over the rim lock to remove the final amount of tire. Now, this is where it gets tougher. Put the wheel back on the wheel stand. Make sure the wheel, tire, and mousse is clean otherwise mud and grime will deteriorate the mousse faster. If you do not already have gloves on, I would glove up. Lube is very important. The little packet of lube that comes with a Michelin Bib Mousse generally is not enough so that is why we also use the bucket of lube mentioned above. Lube the inside of the tire and the part of the mousse that comes in contact with the rim. Put the bib inside of the tire you are wanting to install. The tire needs to be put on top of the wheel that is sitting on the stand. Support the tire with your knee. Then use a tire iron to push part of the lower bead over the rim. Slowly work your way around the tire until the entire bottom bead of the tire is over the rim. Put the tire iron right beside the rim lock and leave it in between the tire and the rim. Lock this in by hooking it under a hook next to the tire changer’s handle. Start pushing the top bead of the tire onto the rim. Small steps with multiple irons help insure the tire stretches over the rim easily. Once you get all the way around to the iron that was beside the rim lock, go ahead and remove it. Push the rim lock in by using an iron and press the last section of tire onto the rim using the bead breaker. At this point, you should be ready to rip again! Sometimes it is necessary to bounce the tire/wheel up and down on the ground to pop the bead in. If that doesn’t work then shoot some air in it, a rubber o-ring should be put around the rim lock to do that. Side note, you will not need to stand on the machine as pictured and if you do…you are doing something wrong. Keep in mind, a Rabaconda is not necessary to mount a bib mouse but a TON of tire irons and lube are the most beneficial things to have. My entire family runs bibs in all of our bikes because getting a flat tire is not worth it to us. More Posts Back To Blog Page

Wrench Tip Wednesday: Installing a Bib Mousse Read More »

Okie Sprint – Outrun the Pack (RAIN) & MHSC – Hardwood Hills Ranch

Okie Sprint – Outrun the Pack (RAIN) & MHSC – Hardwood Hills Ranch This past weekend round 4 of Okie Sprint took place just outside of Bristow, OK right next to Heyburn lake. Racing took place Saturday, so I headed south after work Friday to give myself plenty of time to get there. Promotors of Okie Sprint decided to start earlier on Saturday to try to “outrun the rain” which sounded great to me. The less mud the better! One section was roughly 3 miles of grass track and the other section was considered the enduro section. I had a blast on the grass track, as the race went on it only got better. The enduro section had a few trouble spots (mud holes) but I avoided all of them. It also had a few rock boulder spots that were a lot of fun to ride over. Overall, both sections flowed great and conditions were epic!! I had a ton of fun and rode pretty good finishing 8th in B. The rain moved in after the race and never stopped until early morning Sunday. The plan was to race Sunday also but due to a few inches of rain it was cancelled and looking to reschedule. I was glad but bummed it got cancelled. This time of year, there is always tons of races, it is just a matter of which one do you want to do. Sunday MHSC was racing at Hardwood Hills Ranch in Mansfield, MO which was roughly 3 and a half hours from where I was sitting at 7AM. I checked to see if I could still get signed up arriving that late and was told I could. Which was great! Then they decided to push the race back an hour which gave me more time so that was even better! Can you guess why the race got moved back? It was cold and snowing! YUCK! It had also rained at HHR the entire night before but this place is mostly rock. The drive felt like it took forever but I finally arrived an hour and half before race time. I did not go out for practice but I was not super concerned about it. Just ready to race. This was also my first two-hour harescramble in 7 months. I knew it was going to be wet, muddy in a few spots, and the creeks would be full. I did not have the best start, towards the tail end of the pack. I had a few good battles on the first lap and was feeling pretty good. I did poop out sooner than anticipated but it wasn’t a dramatic I am going to pass out type thing but it was causing unnecessary wrecks. I worked my way up to 6th place and was more than ready to be done! A few ruts got super deep and could get a bike stuck but for the most part it was not bad, just rocky. These days, I like the dirt and even sand better. Overall, I had fun and got my best MHSC finish 6th in B and 30th O/A! Pretty cool deal to be able to race both places this weekend and do well at both! It was a great weekend, now onto the next one, The Off Road Cup (9 hour team race) this upcoming weekend. Great job to the Bonecutter Off Road riders who raced this past weekend! Okie Sprint: Pro – Steve Leivan 2nd (Sherco) B – Tayler Bonecutter 8th (Beta) MHSC: Pro- Scott Boyer 5th (Beta) A Vet – Bryan Kaolowi 7th (Beta) B – Ryan Keune 5th (Sherco) B – Tayler Bonecutter 6th (Beta) C Vet – Aaron Shepherd 2nd (Beta) C Vet – Jeremy Harris 3rd (Beta) Thanks to Holeshots by Cara for the sweet pictures at the Okie Sprint and Puremoto Photography at MHSC! More Posts Back To Blog Page

Okie Sprint – Outrun the Pack (RAIN) & MHSC – Hardwood Hills Ranch Read More »

Wrench Tip Wednesday: Bib Mousse

Wrench Tip Wednesday: Bib Mousse This week I wanted to talk about what exactly is a bib mousse, next week you will get to learn how to mount these bad boys without cussing and whining! Bib Mousse has been around since 1984 first invented by Michelin. It is a tire insert that replaces the need for an inner tube, solid foam that holds its shape. The biggest downfall is you cannot adjust the feel of the tire because you cannot put air in it. It will retain one feel until it deteriorates. But on a positive note, you will not be able to pop it or get a flat resulting in a DNF. I have heard people refer to a mousse as dead feeling. I run both front and rear and don’t have a problem with it. I couldn’t even tell ya what a tube feels like anymore but I do know the impact of hitting rocks hard is reduced, like it soaks it up. How long a bib mousse lasts depends on the rider, riding conditions, and bib maintenance. If you do a lot of high-speed road riding, it will cause the bib to deteriorate faster due to extra friction. Realistically, most riders will get at least 6 months (if not longer) out of their bib mousse. Every so often, it is a good idea to unmount, clean, and re-lube the bib. Dirt and mud can cause premature wear. Another common question, what size bib mousse is needed? To achieve the best performance from a mousse, the fit between the mousse and the tire is critical. The mousse needs to put a certain amount of internal pressure on the inner tire casing in order for the tire to have good stability and to lessen sidewall rollover. This is a problem, since most tires vary in their inflated size for any given tread width and overall diameter. Since a mousse’s tire pressure cannot be changed, the mousse’s tire pressure feeling is dependent on the tire’s casing size. A tire with a mousse rides like a tire with 8 to 12 psi of pressure. Since it is rare that a rider chooses 8 psi for his air-filled tubes, most riders do not like the feeling of a tire with such a low pressure. One solution for this problem is to stuff a mousse designed for a larger rear tire in a smaller rear tire: a 140/80-18 mousse inside a 110/100-18 tire. Same goes for the front tire. We run Bridgestone M59 on the front of our bikes 80/100-21 and we use the big mousse for it, M16 90/100-21. Tightly compressing an oversized mousse inside a smaller tire casing creates a higher pressure feeling. But, be forewarned, it doesn’t want to go into the smaller tire without a fight. If the mousse feels too stiff, holes can be drilled down the center of the mousse. Doing this, will shorten the lifespan but will make it feel softer. We keep all bib sizes on hand at the shop. Well worth the money vs the money a person is out with a DNF from a flat! Stay tuned next week on how to properly lube and mount a bib mousse. More Posts Back To Blog Page

Wrench Tip Wednesday: Bib Mousse Read More »

Okie Sprint Enduro – The Sprint 111 Ranch

Okie Sprint Enduro – The Sprint 111 Ranch Round 3 of the Okie Sprint took place this past weekend in Maramec, OK. According to Google this is an old ghost town, it is roughly a 5 and half hour drive from Mid-MO. This event was co-sanctioned with Black Jack Enduro Championship (BJEC), so the format was a little different. Split into two groups, long course which included B and above and the short course which included C and below. Two sections, long course had to do each section 4 times each and had two hours to do one section 4 times, plenty of time. Come and go as you please but must finish in the time limit. I race B class, so I was in long course group. I arrived Saturday early enough to walk one of the sections. Looked like there could be a few potential trouble areas, mud holes. Luckily, the rain cloud missed the 111 ranch so for the most part the trail would be pretty good. Saturday night, I got treated to a nice, thick juicy steak from Asa Hancock and his buddies. It is a good feeling when you are away from the normal race crew and people still know ya. It is interesting. Anyways, SHOUT OUT AND BIG THANKS TO THEM, IT WAS A GOOD STEAK! Race day, long course group started on the loop I did not walk. I felt like it was pretty muddy and I struggled to find my flow. Roots were slick, the ruts were deep, and the small amount of rocks present were slippery. My second time around this loop, I took an inside line on a corner (I did take it my first time around) trying to get around someone and sunk my bike. No joke, it was deeper than swingarm deep like to the bottom of my plastics deep. First thought was, well shit. I tried everything I knew to do, wedge it out with sticks, make the rut wider to lift it out, tried laying it over, put a shoulder under the rear fender to use my legs to lift it out. It was not gonna budge by myself. Luckily for me, some nice older gentleman decided to stop and help me out. I was very thankful for that. We tag teamed lifting it out and I was finally on my way. I lost about 6-7 minutes here. When something like that happens, it is all on how you react. A person can get a crap attitude, give up and quit or you can get back on the bike and race your heart out. It is all in your reaction. After I finished that lap, I will admit I was frustrated but I cleaned my goggles and lined up to go out for my 3rd loop. This time we were routed around another trouble area and I knew to not take that inside line in the other area. Finished it and immediately went and got the fourth one done. I still did not feel like I had a good flow. I checked the live results after I was finished during the break before the two groups switched sections. Looked like I was around 6 minutes down from the person in front of me and not in last. From what I had seen walking, I knew this section would be way more fun for me. I got my positive pants back on and was ready to rip. Patiently waited my turn in the long line of people, waiting to get back out there. Finally, my turn and I was feeling pretty good. Leaving the last part of the trail before the massive field section there was a big terrace that I had forgot about. I definitely sent it over faster than I would have had I known it was there. But it was fun and I stuck the landing. Each time out I had more and more fun. It was fast flowy trail and the grass track was fun too. After my last time out, I was not ready to be done and would have loved to keep riding, that section was that good! I made up 3 minutes on one guy and gained a position in the class finishing 13th for the BJEC part of it and the Okie Sprint combined some of the classes to fit their classes available so I am not positive what I placed with the combined part. I was not super thrilled with my finish but what can you do when you decided to bury your bike in a deep rut. I am already looking forward to round 4 and 5 this upcoming weekend! Great job to the other Bonecutter Off Road riders who were there! Pro – Steve Leivan 5th (Sherco) A – Broc French 7th (Beta) More Posts Back To Blog Page

Okie Sprint Enduro – The Sprint 111 Ranch Read More »

Wrench Tip Wednesday: Changing Oil

Wrench Tip Wednesday: Changing Oil Don’t neglect changing the oil in your dirt bike. It lubricates the engine and clutch. We base our oil change schedule off of hours since last changed and what kind of conditions we rode the bikes in. Also, the rider is a variable. If you know you’re hard on clutches, your transoil should be changed often. Almost always after racing and before racing again, we change the oil. First step, gather supplies; oil, if 4T oil filter, catch pan, funnel, and tools. When it comes to choosing the oil, always take into account the manufactures recommendations and then personal preference. Beta USA recommends Motul. It is costly but the longevity of the oil itself and engine parts is worth it. On Sherco, an oil made for “wet clutches” is recommended. We have had excellent luck with Bel Ray Thumper Synthetic. We keep both brands in stock. For more info, refer to a previous blog post about the different oils out there. Place the catch pan below the drain plug. Unscrew the oil fill cap, it will help the oil drain better. Remove the drain plug. Let all the oil drain. If a 4T remove the oil filter cover. Let the remaining oil drain. Inspect the filter for metal and dirt. Also, smell the oil. If anything out of the ordinary, consult a professional (a local shop), especially if there is metal on the filter. Put some oil on the new filter and install. Put the cover back on the filter. Refer to the manufactures guidelines on how much oil goes in the bike. Grab a funnel, lots of different styles out there but our favorite is Motion Pro brand Pro Funnel. It is fancy, has a shut off valve, graduation marks, adjustable ball pivot spout, and trimmable tip, also in stock at Bonecutter Off Road. Start filling to the proper level. Insure the oil is filled to the proper amount and install the oil filler cap. Fire the machine for a few minutes. Shut the dirt bike back off and let it set for a few minutes. Check the oil level again. Pro tip: If your oil smells like death when drained, next time change it sooner or change the type of oil you are using. More Posts Back To Blog Page

Wrench Tip Wednesday: Changing Oil Read More »

Scroll to Top