Business Hours

Sunday Closed
Monday 8:00 AM to 5:00 PM
Tuesday 8:00 AM to 5:00 PM
Wednesday 8:00 AM to 5:00 PM
Thursday 8:00 AM to 5:00 PM
Friday 8:00 AM to 5:00 PM
Saturday Closed

February 2022

Big Buck GNCC 2022

Big Buck GNCC 2022 Race season has officially arrived! My first race of the year kicked off in Union, SC for round 1 of GNCC. My plan this year is to chase the entire series and race in the women’s class. The only GNCC I have ever been to or raced prior to this was Ironman 2021 (the mudder/river race). To me, that shouldn’t even count. Not even close to what I experienced this weekend. A little rain on Thursday made conditions for Sunday PRIMO! I really did not think the trail was that rough but some others disagreed. Saturday after the PM quad race, I broke out my Giant Liv Ebike from Sunshine Bike Shop to check out the trail. I am not the greatest on one, wrecked about 10 times, but made it around the track! Sunday, the race started at 10AM. I was kind of nervous. I have only done a few races since coming back from an 8-month long injury so lots of cobwebs to rid of. I got up to the start line 20 minutes before the race and it still was not early enough. I prefer to be on the inside and not on the outside. I made due with what I was delt. My start was in the tail end of the pack. I lined up with 20 women racers! SO RAD! The first lap, felt like I was fighting for my life. No one prepared me for that lol so I was in complete shock! I got taken out six times. I for sure lacked aggressiveness. Every time a line would meet up, I would be the one to let off and it really set the tone for my race. I did not ride up to the speed I am capable of. The second lap, I came up on a friend who just wrecked and was injured, I made sure he was good and someone was with him and then stopped to tell the family. My third lap was lots of catching riders and passing them. Nothing very exciting happened on it. The trail was not very technical at all. The hills were not super huge. The roots were not terrible. A few rocks here and there and one small log. It flowed well and the 11-mile loop went fast. I learned a lot and have a far better idea what to expect going into round 2. A few big takeaways for me were: I have to be aggressive. That’s a given in any race but I am not used to lining up in a race with 800 people in it. It doesn’t matter what class they are in; I have to keep moving forward and not let others dictate the speed I go. I need to worry about what I am doing not completely what the other 10 people in front or behind me are doing. GNCC’s are more mentally intense because there are no moments available to get “bored” or distracted by outside factors. So much going on the entire time, mentally you have to be in the moment to get through the traffic and carry speed. Overall, my conditioning is there, I just need to get my mind to handle the chaoticness. I finished P-9 at the first round! Massive thanks to the Matteson’s for hauling me and all my stuff to South Carolina and for taking care of my start and pit needs! It was fun and interesting! Also, I want to thank the people supporting my mission this year: My parents Bonecutter Off Road Enduro Driven Fasst Company Fly Racing Bike Graphix Eline Accessories V3 Off Road Dunlop Enduro Van T3 Fitness Reset Health & Fitness Mariah & Robby Congratulations to fellow Bonecutter Off Road racer, Steve Leivan on his 1st place finish in A+50 at Big Buck! Another congratulations to Morgan Johnson on her solid 15th place finish in the Women’s class on a Beta 125! This year is for Frank, the best pit crew, the one who would never let me quit a race, the one who has been at 80% of my races, and the best story teller. #FrankTour22 More Posts Back To Blog Page

Big Buck GNCC 2022 Read More »
GNCC Race Bike Build

GNCC Race Bike Build Do bikes come ready to race off the showroom floor? My answer is no. This is not limited to Beta or Sherco, it goes for all different brands of dirt bikes; no bike comes off the floor completely ready to ride. With that being said, a key secret to successful bike setup is knowing when to start riding and stop tuning. The featured bike in this blog is a Beta 250 Race Edition. The first step to a race bike build, is to stripe it to the frame. Literally. Everything comes off, tank, plastics, exhaust, speedo, horn, etc.. On my bikes, we install the race wire harness. It removes all the extra wires used for the lights and cleans up the harness. Basically, everything unnecessary comes off. All the wires and CDI were rerouted to the right side of the bike for extra protection and less likely to receive excessive water damage. Make sure the CDI is pointed downward. Next order of business was removing the linkage and swingarm to grease ‘em up. Most manufactures do not use a lot of grease on their bearings in the factory. By addressing this when the bike is new, the life of the bearings is prolonged. A massive benefit of buying a new bike from us is we do this in a Pre-Delivery Inspection as a bonus to our customers at no extra charge. There are times when Loctite is necessary and times when anti seize/grease is necessary. Red grease was applied to the chain adjusters and brake pins, helping to ensure upon removal, down the road, they would not strip. On the engine mount bolts, red grease was applied to the bolt and Loctite on the nuts. Another crucial place for anti seize is on the bolts holding the plastics on, especially the tank ones. Strip out the tank and that’s no good. A couple “pro tips”: On the rear brake caliper, the brake line can be knocked loose, to help this issue, it is tightened to the inside and then wire tied. The front brake line is also prone to loosen up and get into the spokes which can destroy the brake line. It is very important to watch this and keep the fork guard clamp tight and position it accordingly. To help ensure it stays put, we wire tied the clamp. Extra rubber hose was attached to the brake line for extra protection on common wear areas. On the rear brake master cylinder, we flipped the pin around for easier removal. In Missouri, the stock jetting is usually good. So, we leave that alone until there is an issue. From factory, the carb vent tubes are located at the bottom of the bike. This can allow dirt, sand, or water to be sucked up. Go ahead and prevent this, a carb vent kit is installed, relocating the vents to under the seat. For under $25, you will be saving yourself a lot of future wear and tear. Rerouting the vent hoses, also helps with prevent a throttle sticking wide open from sucking up dirt. Time to address the cooling situation. Never in my life have I overheated a Beta two stroke. The thermostat located in the cooling hoses is pronged to leaking. Before it is a problem, a Boano hose kit is installed. This deletes the thermostat and also keeps the bike cooler. Samco hoses are also a great brand. The OEM coolant is removed and replaced with Engine Ice. We do this because when in a pinch it can be mixed with water unlike many other brands. We keep Engine Ice on hand, so it keeps it simple. For added insurance, we install a fuel filter on the bike. It’s cheap so why would you not do that. We do add it to all new two strokes that we sell for another added bonus of buying new bikes from us. Time to install the air filter. REMEMBER, a THICK bead of grease is applied around the rim along with filter oil applied to the filter. This is a MUST every time an air filter is installed. Otherwise, the filter is not properly sealed and will allow dirt in the carb, which may result in premature engine issues. Time to install guards using blue Loctite. In the off road world, guards are pretty important. While the Loctite is out, be sure to Loctite the frame to subframe bolts and the seat bolts. For the rear disc protection, I chose a blue Bullet Proof Designs guard. In the past, I have changed the OEM chain guide for an aftermarket one but the 2022 Race Editions come with a decently thick one so I will use the stock one for awhile. When I do upgrade, BRP is the way to go. The tank vent tube is ran all the way into the skid plate. We cut the cooling line shorter so it is not running into the skid plate otherwise you will not know you leaked coolant in the skid plate. This is crucial for the tank vent tube because it could vapor lock or wash out your bearings if not routed correctly. Beta does come with a skid plate but I upgrade to a thicker one. I use the Eline carbon fiber skid plate paired with an Obie link guard. Bullet Proof Designs radiator guards are installed for radiator protection. I usually, do not run the stock exhaust and save it for when it is time to resell the bike. I run a FMF Fatty and FMF 2.1 silencer. After installing the exhaust system, install zip ties around the seal between the silencer and the header to prevent oil seepage. One item that I highly recommend on all brands of bikes is a Enduro Engineering slave cylinder guard! It saves your case and is better than the stock one! Guards are important, but so are the things I think I cannot live without! First up, Fasst

GNCC Race Bike Build Read More »

Parts & Guards Used on Tayler’s Race Bike

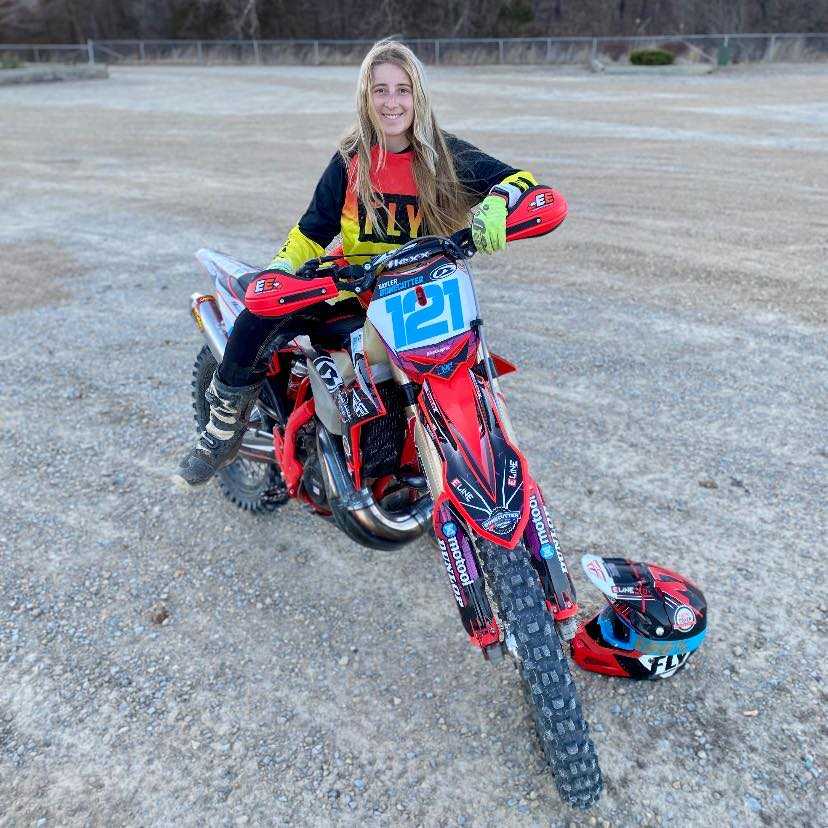
Parts & Guards Used on Tayler’s Race Bike I use what works. I trust the brands that work and help me perform at my best. With that being said, below is what my bike set up looks like! Let’s start with the handle bar area! I’ve been using Fasst Company Flexx Bars for four years now. They get rid of the rigid feel that standard bars have. With the added comfort, perfect bend for me, and help rid of some vibration, I refuse to go without. It’s uncomfortable riding without Flexx Bars. ARC levers are impossible to brake, help my small hands grab and feel the lever better, and the melmon version allows for extra flex in the lever. ODI Emig grips feel like a hard grip but ultimately do not make my hands/wrists hurt. I never get blisters. ODI Emig grips are also lock on which means NO MORE SPINNING GRIPS! For hand guards, I use Enduro Engineering full wraps and threaded bar end inserts. Threaded bar end inserts help keep the handguards in place after a wreck. Next up, exhausts! I take the OEM exhaust off to save for when I resell the bike. I choose to put a FMF Fatty on paired with FMF Powercore 2.1. It looks so rad on the bike but improves the performance of the bike. What about protection? As the years go on, I put the bare minimum needed for off road racing on. I upgrade the skid plate to Eline carbon fiber and an Obie linkage guard. I use Bullet Proof Designs radiator guards and rear disc guard. Some do not see the importance of a rear disc guard, but you are more likely to bend a rotor than you are to get a rock stuck in between it and the guard. I also upgrade from the OEM chain guide to a thicker one made by BRP. The case saver is upgraded to Enduro Engineering for better protection and easier cleaning. Plus, the handguards mentioned above. That’s it. I feel my most stable on the bike when using Fasst Company’s Impact Peg. The pegs are wider than OEM pegs and isolate the cleat from touching metal to metal making them absorb more vibration. The Impact Moto Peg also has the perfect tooth combo, I can remove my foot if I need to and not get “stuck”. I use the stock Beta seat foam; I actually prefer the firmness compared to a soft foam. I ditch the OEM cover and put a gripper cover on. Bike Graphix does all my graphic kits. They are the only company who I have found that has true Beta Red not Honda red! Bike Graphix also uses good quality material and has super-fast turnaround. My current tire set up is Dunlop MX33 on the front and rear. I use Michelin Bib Mousses. They make the tires not bounce as much on the rocks and absorb some of the bigger impacts. Plus, that means no flats ever! I get my suspension set up for me to handle 90% of the terrain I ride. I get the proper springs for my weight and have the valving tweaked to meet my needs. I am 5’2. I usually have my bikes lowered an inch but I am going to try to trust my skills and balance and not do that anymore. I keep the gearing stock. I adjust the powervalve to flush with the case and majority of the time, keep the stock jetting. I upgrade the stock cooling hoses to Samco or Boano to keep the bike cooler and eliminate the thermostat. The bike is designed a certain way so to make all this wild mods are not necessary for most riders. All of that gives me the best-looking bike, the best riding bike, and the most fun bike! More Posts Back To Blog Page

Parts & Guards Used on Tayler’s Race Bike Read More »

Scroll to Top