tech tip

Wrench Tip Wednesday: Footpegs

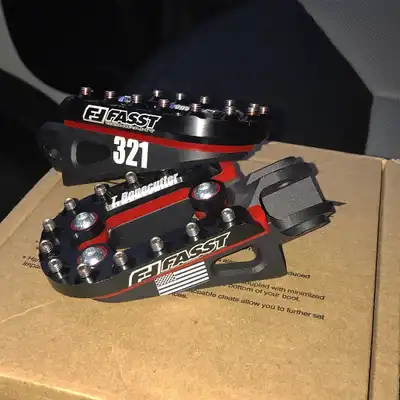
Wrench Tip Wednesday: Footpegs A common upgrade on a dirt bike is replacing the OEM pegs with beefier, wider, colorful, or vibration absorbing footpegs. Keeping your feet stable on the pegs is so important, you ride a dirt bike with your lower body not so much on the upper body! So many good brands out there varying in prices. My peg of choice is Fasst Company’s Impact Moto Peg. Since I have started using them, I feel more stable on my toes in sketchy situations. They are wider than OEM pegs and isolate the cleat from touching metal to metal making them absorb more vibration. The Impact Moto Peg also has the perfect tooth combo, I can remove my foot if I need to and not get “stuck”. MSRP $259.99 and well worth the money! On the cheaper end, Moose Racing makes a wide footpeg with extremely sharp teeth coming in just under $100. Warp9 is another good brand for wider footpegs, also under $100. Fastway is a big seller at our shop. They offer lots of different options; adventure, wide, adjustable height, and ankle savers. Prices are from $199 – $275. Basically, either you know what you like or you research them all and see what is worth it to you. But if you are standing on skinny OEM pegs, I strongly recommend investing in a set of wide ones. Time to learn how to put these fancy pegs on. Grab your tools! All that is needed is a set of needle-nose pliers, a hammer (best to stick to a rubber mallet), and a long, flat-head screw driver. Some bikes need the brake pedal removed to get the footpeg pin out. If that is the case, a few more tools might be needed. Be sure to check the backside of the brake pedal pin for a lock nut or cotter pin. If you don’t, the cotter pin can be damaged or strip the nut. A washer and split pin lock the pivot pin in place. Locate the split pin at the bottom of the footpeg. Grab the needle-nose pliers, get the split pin as straight as possible. Sometimes this can be a chore but be patient! Once it is straight, grip the head of the split pin and pull it through the hole in the pivot pin. Now the pivot pin can be pushed up and out. Warning, the footpeg spring is stiff and puts a lot of pressure on the pivot pin, so it could be harder than one would think. Wigging the peg around while pushing or pulling on the pivot pin will help the removal. Now that it is off, clean and remove old grease and dirt from the surface of the footpeg mount. Inspect the mounts for signs of wear or cracks. PRO TIP: Put the pivot pin back through to see if the holes have been elongated over the years. Excessive wear in this area can cause the footpegs to droop and become difficult to ride with, increasing the chance of your foot slipping off. Which could be bad! Inspect the pivot pins for wear, deep grooves mean it is time to replace. Time to install the new pegs! Apply waterproof grease to the pivot pin as lubrication. Put the return spring in the correct position, there will be some tension as the footpeg is inserted. Using a screwdriver can help guide the peg into position by levering it against the spring tension. Push the pivot pin in. The footpeg might need to be wiggles to get it all the way in. Hold the washer in place then slide the split pin through the holes in the end of the pivot pin. The washer is there to prevent wear on the split pin as the footpeg pivots. Always use a new split pin. An old split pin may be weak from metal stress; vibration can also cause the split pin to fail. Fold both legs round the pivot pin and trim them with side cutters. Use the largest split pin that will comfortably slide through the hole. Remember – if you get yourself new, fancy foot pegs that means you better be standing and not sitting on your rear!! More Posts Back To Blog Page

Wrench Tip Wednesday: Footpegs Read More »
Wrench Tip Wednesday: Dirt Bike goes for a Swim

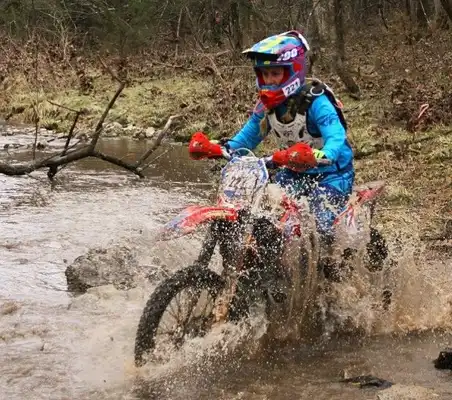
Wrench Tip Wednesday: Dirt Bike goes for a Swim This time of year, Missouri tends to be very wet. Really no way to avoid it, if you want to ride. Creeks can be misleading! Or the random holes filled with water. Not sure what is worse the shock to your body of the cold weather or letting the bike swim. If it is a quick submerge there is a chance the bike might still start. But a hot engine and cool water never mix. First, I would try to start it. If it does not start, pull the spark plug and flip the bike upside down. Kick the engine over. This helps push any water out of the top end. Flip it back over and install a sparkplug. If you do not have a spare with you, dry off the one you pulled out. Keep your fingers crossed that it starts otherwise you will be pushing the bike back. Be sure to change the air filter and oil once you get back. What if the bike does not start and needs to be pushed back? Load up and head home. The process is similar as above. Take the spark plug out, flip upside down, and turn the engine over. Drain the oil. Change the air filter. The float bowl could also be filled with water so check that. In extreme cases, it would not hurt to go ahead and replace the exhaust packing. With fresh oil, spark plug, and air filter installed go ahead and start the bike. Oh no! It still does not start, this could mean a complete engine rebuild may be needed. Don’t fret if your mechanic skills are not up to par, take it to a local shop and let them dig into it. A good rule of thumb, always be honest about what has happened to the bike even if it is embarrassing, not just referring to the bike going swimming any instant something mechanical fails, tell the story. It helps the mechanic understand what has happened and why it happened. More Posts Back To Blog Page

Wrench Tip Wednesday: Dirt Bike goes for a Swim Read More »

Wrench Tip Wednesday: Power or Torque it?

Wrench Tip Wednesday: Power or Torque it? Although, stopping to look up torque specs and grab a torque wrench can be a pain in the rear, it can save you money in the long run. Think about all the nuts and bolts you’ve stripped by over tightening. Or what about the sketchiness of under tightening sprocket bolts or axle nuts. A good rule of thumb, always use a torque wrench on all engine related matters or mechanically functioning bolts. Manufactures finely tune their bikes to specific torque values. With that being said, a Beta might have different torque specs than a Sherco. Always refer to the owner’s manual. Beta USA also has the torque specs on their website under the support page. It is also on our website under tech tips. Different parts of the bike might require a specific pattern to tighten each bolt, such as cylinder and head. Which is another reason to check out your manual. Sometimes, a torque wrench might not be available. That means, you need to be comfortable with hand tools… not power tools. You should be able to feel how tight the nut or bolt is as you tighten it down. A 2-inch cheater bar should not be used to tighten a small bolt. Use the proper size tools for the job, it is not a go big or go home game. A ¼ inch ratchet will get the job done. Don’t crank it down as tight as possible to the point of almost stripping because realistically 14 NM is not a lot on a rear brake rotor. Remember, use Loctite on anything that should not come apart on its own or never come apart but do not forget about anti-seize on everything else to help prevent stuck bolts and protect against corrosion. Get to torquing! More Posts Back To Blog Page

Wrench Tip Wednesday: Power or Torque it? Read More »

Wrench Tip Wednesday: Flushing the Cooling System

Wrench Tip Wednesday: Flushing the Cooling System Flushing the coolant out of your dirt bike should be a yearly maintenance deal or if you are changing brands. Different coolant brands should never be mixed. Chemical reactions can happen with lots of possibilities of damaging the bike. Automotive coolant can be used but may require more maintenance verse specific motorcycle/powersport coolant. Things to look for when looking at different brands; Propylene Glycol (biodegradable and non-toxic) and should not contain any silicate or phosphates. If the coolant does, it can break down, build a thick layer, and the engine could potentially overheat or it can eat the water pump seals. Engine Ice is one of the two popular brands we sell. It is Propylene Glycol, premixed with deionized water to eliminate impurities, and in a pinch water can be added. The other customer favorite is Evans, also Propylene Glycol with high boiling point, containing no water. The major downside to Evans is that it cannot be mixed with water or anything! NEVER change coolant on a hot bike. NEVER remove the radiator cap on a hot bike. When coolant is heated, it is under pressure and can potentially spray and burn your skin off. To drain the coolant, locate the drain plug bolt. Generally, it is found on the water pump housing. The bolt will have a copper washer on it, do not lose this. After the drain plug is removed, remove the radiator cap. Let it completely drain out. It can be messy trying to get the pan in the right spot to catch it all. Pro tip – if you change coolant regularly and use a non-corrosive formula you will most likely not need to flush unless you are changing brands. Put the drain plug back in. Pour water into the radiator. Install radiator cap. Start the dirt bike, run until operation temperature. Let it cool, then drain it out. Install new coolant and be sure to check for leaks. While in the cooling system, it is a good idea to go ahead and check the water pump for dirt or corrosion. If the impeller can be moved up or down, bearings and seals are needed and maybe a water pump shaft. Oil leaking into the water pump can also be sign of bearings and seals in need of being replaced. Winter is the perfect time to do this to help ensure the coolant won’t freeze and the bike will be ready for the upcoming riding/race season! More Posts Back To Blog Page

Wrench Tip Wednesday: Flushing the Cooling System Read More »

Wrench Tip Wednesday: Mixin’ Gas & Haulin’ A..

Wrench Tip Wednesday: Mixin’ Gas & Haulin’ A.. Chances are if you own a two stroke dirt bike, you have to mix gas. There are a few modern age bikes that come with oil injection such as 2015+ Beta Xtrainer 300 and 2017+ Beta 250/300 RR. The oil in the gas acts as a lubricant and burns off with fuel as you ride. This seals the piston and is critical. If you remove the lubricants from the gas, the viscosity of the mixture becomes lighter and more prone to vaporization. With a lean mixture there is less oil to seal the rings. The sealing of the rings has more to do with the performance of the engine than the possibility of having better-burning gas with an ultra-lean gas/oil ratio. What dictates oil usage? · Oil quality · Engine size – 125CC and below will use a higher oil to gas ratio (24:1 – 40:1) and 250CC + (32:1 – 70:1) will use less. · Engine usage – as in how hard it is being rode and how often the bike gets to “sing” The number one rule of thumb is to refer to the owner’s manual and see what the manufacture recommends. Be sure to inspect the spark plug regularly to see if it is overly oiled, black looking. If it is that means your bike is too rich (too much oil in the mixture). So, put less oil in the gas. Sometimes the jetting can be the cause of this and might need to be adjusted but we have not had to do that to any of our bikes. All of these things mentioned above need to be taken into account before mixing the gas. The mixture for my 2018 Beta 250 Race Edition varies depending on what oil I am using. I was using Motul 800 at 50:1 – 60:1 but felt like it was over oiling even oil clogged a spark arrestor! At the Beta USA dealer meeting, it was recommended for that particular oil to be mixing 70:1. I just recently switched back to it so I do not have a complete update on how that mixture is acting. The other oil I used was BelRay H1R and it works best 50:1 – 60:1. Both are very good oils. At the shop, AmsOil Dominator seems to be a popular pick. I have talked to a few people about what ratio they use and 50:1 seems to work well. A few oils out there say they can be mixed 100:1, I do not trust it but if it works for you, go for it. Time to mix the gas. Fill up the gas can, make sure you know how many gallons you put into it. Know what ratio you are going to mix it at. A Ratio Rite or any other brand of mixing cup makes pouring the correct amount of oil a breeze. Be sure the mixing cup is placed on a flat even surface for an accurate measurement. Depending on which style of cup you have depends on how to read the cup. Some cups will have the gallons or ounces at the top of the cup. Look for the one with the amount of gas you have. After that is found, know the ratio you are trying to mix and find it. Pour the oil to the correct line and then dump into fuel container. Shake very well. More Posts Back To Blog Page

Wrench Tip Wednesday: Mixin’ Gas & Haulin’ A.. Read More »

Wrench Tip Wednesday: Bike Setup – Handlebars

Wrench Tip Wednesday: Bike Setup – Handlebars Man, so many choices for handlebars! This is a personal preference item for sure but there is many things to consider. Height A handlebar’s height is the measurement from the clamp area to the top of the control length or end of the handle part of the bar. The height of the handlebar can be adjusted by loosening the bar at the clamp area and adjusting forward or backward to your preference. Rise The rise measures the length from the clamp area to the handlebar’s first steep bend. To lengthen the rise, you can use riser clamps to maximize the handlebar’s overall height. If you are short, there are midget bar options. Width The handlebar width is measured from one end to the other or the end of the left control length to the end of the right control length. Generally, most handlebars are constructed within a few millimeters of one another if not the same width altogether. Sweep The sweep is best viewed by looking at the side of your bike. Also known as the “pullback” it is measured from the center of the clamp area to the end of the bars (control length) in a letter “L” shape. Control Length The control length is the area for your grips. Clamp Area The clamp area is the bottom of the handlebars where it clamps onto the bike. The clamp area is where you can add risers and other equipment to change the measurements and feel of your handlebars. The thickness of the clamp area is 7/8th or 1-1/8th -inch. So, when the style or size has been decided, how does a person choose what brand to use? I am currently running Fasst Co Flexx bars and love them. When I ride with standard bars, they feel too rigid like there is no give. I do not notice while I am riding that the Flexx bars are bending/moving but without them it is a huge difference and more fatigue in my hands/wrists. Flexx bars are designed to reduce vibration with the use of rubber elastomers which help with arm pump, fatigue, and takes away the harsh pounding to the upper body. They work for me and that is what is on my bikes. In the past, I have used Protaper bars, woods low. This is a good bar for shorter people. My dad being taller than me used woods high. What it comes down to, is trying different ones and see what works best for you. Tons of options out there! More Posts Back To Blog Page

Wrench Tip Wednesday: Bike Setup – Handlebars Read More »

Wrench Tip Wednesday: Installing Graphics

Wrench Tip Wednesday: Installing Graphics One of the easiest things a person can do to their bike to make it stand out from the rest is buy custom graphics. Easy & reserved or extravagant with a flare, a fresh set of decals is a fun way to show style. This is my least favorite job to do and for some reason takes hours for me to complete. When it comes to graphic time, for me choosing colors is the hardest part! Should I do red, white, and blue or neon yellow and red or maybe gray and blue. The possibilities are endless!! Once the kick butt decals are received it is time to install. Majority of the time, when I get new graphics I am in need of new plastics. So, I plan for that. Lay out all of the plastics, in a warm place. To be on the safe side wipe down with rubbing alcohol. This helps ensure the plastics are clean. New plastics are not necessary if the current ones are in good condition still. Get a heat gun and start heating up the current decals on the plastics. This will help make sure the glue does not stick to the plastics. A hair dryer will also work but I do not recommend using your mom’s/sister’s/wife’s/girlfriend’s favorite, most expensive one. Then remove all the plastics off of the bike. Now it is time to start scrubbing. The plastics need to be extremely clean. Use purple power and a scrub brush to get the residue and dirt off. Dry completely and wipe down with rubbing alcohol. If glue residue is there, use wax-n-grease remover to get it off. There are two methods of putting decals on, wet or dry with a heat gun. I have always done the wet method and have not tried anything else. Peel the decal from the backing. Then get the sticky part wet. I just use a sink. A spray water bottle can also be used. Getting the decal wet allows more freedom of sticking and pulling back off. I like to start with the easiest ones to install and work my way up to the harder ones. Once the decals are straight, press down and use a squeegee to get all the water out and ensure it is stuck. The squeegee is also used to get any bubbles out. Sometimes poking a hole in the decal is necessary to pop the bubble. I prefer to put my graphics on when the plastics are off the bike. So, when I am finished with the decals, I put the plastics back on my bike and admire the beauty. More Posts Back To Blog Page

Wrench Tip Wednesday: Installing Graphics Read More »

Gearing up for Race Season: Part 1

Gearing up for Race Season: Part 1 Under two weeks left until the first race of the year and it might be time to start inspecting the race bike. Either you have rode the bike all winter or you parked it after the last race. Sometimes things needing attention can be forgotten and that is exactly why the dirt bike should be looked over a few weeks prior to the first race. It ensures you have time to go to your local dirt bike shop for parts and maybe even get them installed. For me, I spent most of the winter on my 2018 Beta 250. It currently has around 40 hours on it. Not a lot of maintenance is needed at this time. After my last ride on it, I gave it a really good bath. Removed all the plastics and the tank and went to town scrubbing on it. It took FOREVER but totally worth it. While I do this, I look over the bike and make mental notes of what is needed. Generally, after a full season of racing and practicing my bikes are in desperate need of fresh plastics. So, before the first round I like to get new plastics and new graphics. Not a necessary item but what else am I going to spend money on? I shoot to have the plastics and graphics done at this time so I do not have to put the old plastics back on during the first race prep. Inspect the handguards. Are they loose? Are they so bent new ones are needed? 9 times out of 10 this is the case for me, so I plan on replacing them at this time. What about the grips? Is it time to replace them? INSPECT EVERYTHING! I tend to have a problem with bending headers. I guess they are kind of a disposable type item. I make sure that it isn’t so bent that it will be a problem. Like making sure it is not rubbing on hoses. Luckily, my FMF Fatty is in good shape! After the appearance check over is finished, I start reading my dirt bike diary to get a refresher on what has been done and what has not. Oil change for sure. Did the oil smell burnt? Wouldn’t hurt to check the clutch to make sure everything is in working order. Brakes and clutch need to be bled. Look at the brake pads, if they are border line replace go ahead and replace them. Install a new sparkplug. Clean the air filter or buy a new one. Check the coolant levels. Do the fork seals need replaced? What about the fork fluid, is it time to change that? How are the chain and sprockets? Again, if it is borderline, I lean more towards replacing. What is the point of starting the season with junk parts? Are all the bearings in good shape? Would not hurt to go ahead and disassemble the linkage and swingarm bearings and add more grease to them. Don’t forget the tires! If bibs are ran are they still good? If not, check the tire pressure and make sure the tubes still hold air. Another thing to consider, is it time for a rebuild? If it is near time, go ahead and get that out of the way now. As I stated above, my bike has 40 hours on it, so I do have some life left on the top end. After all parts are replaced that are needed, start assembling! In an ideal situation this is at least a few days prior to the race. When finished, stare at the beauty and take pictures. Ride it around some. Get your competition face on because it is race season!! More Posts Back To Blog Page

Gearing up for Race Season: Part 1 Read More »

Wrench Tip Wednesday: Repacking Silencers

Wrench Tip Wednesday: Repacking Silencers   Ever have someone ride by and their bike is super loud, like so loud you cover your ears? Chances are their silencer needs to be repacked. The exhaust packing from the bike’s engine exits the pipe in waves and travels through the silencer. Packing around the core lets the silencer control the waves as they leave the bike and also keeps sound levels down. It is obviously when a person’s silencer packing is no longer good. Unburned mixed gas leaving the cylinder or excessive heat wears on the packing. There are many benefits to repacking your silencer. You don’t loose your hearing (Reducing sound levels) Can improve the throttle response Can restore peak power (who doesn’t like power?)   First off, remove the silencer from the bike. If it has a spark arrestor remove it before proceeding. Remove the allen screws or rivets from the front of the silencer – do not remove the rear end cap. Hold the front end cap and begin working it out of the cannister. A rubber mallet might be needed to lightly tap the mount to get the front end cap to break loose. Slowly pull the core all the way out, exposing all the remains. Unwrap the old packing from the core and discard. Clean the core with a wire brush to ensure no clogs and remove all old material. Align new packing with the longest dimension to be the length the core. Wrap the core. Secure the packing with ½” masking tape near each end. The packing should be snug but not too tight. Apply a thin bead of high temp silicone to the front end cap where contact is made with the canister. Reassemble the silencer and wipe off any excess silicone. Now your bike might have more horsepower and your ears live to hear another day! More Posts Back To Blog Page

Wrench Tip Wednesday: Repacking Silencers Read More »

Wrench Tip Wednesday: Grips

Wrench Tip Wednesday: Grips Grips are a wear item that should be replaced as needed. If you are gripping the bike more with your legs and less with your hands, the handlebar grips should last for what seems like forever! First off, choose what type of grip you want. I use to have a problem with twisting grips. They could be glued and wired on and it I would still twist them! A few years ago, I finally decided to try lock on grips, I no longer twist grips. I use ODI EMIG lock on, they are a little harder than most grips but don’t death grip them and its not a problem. These grips also come with a new throttle tube every time they are replaced. My dad likes the Risk Racing grips, they are a little bigger than the averaged size grip. My brother prefers the Renthal Kevlar grip, they are overall a softer, tackier type grip. If you go with grips that do not lock on, make sure you have grip glue and wire. It also helps to have safety wire pliers. Sometimes, the old grips come right off with ease once the wire is cut off. If it doesn’t, get a knife or a razor blade and start cutting the old ones off. Once the grips are off, clean the bar and throttle tube thoroughly with contact cleaner. It is also, a good time to inspect the throttle tube for excessive wear. If it is cracked or chipped go ahead and replace it. Get your fast hands and glue ready. Apply a small bead of glue on the inside of the grip and on the edge of the handlebars. Try to make putting the grip on in a smooth motion. Make sure the grips are in the desired position, if not you have to live with the way it is. Do not get any glue under the throttle tube. Some people prefer to not use grip glue and use spray paint. We have tried that and it seems to work about the same as the glue (still need wire). Pretty much just spray the paint on the bar and slide the grip on. Let the glue dry completely. Install the safety wire. I recommend at least two wraps of safety wire around the grip. I use to do three, inside, middle, and outside. Safety wire pliers make this job way easier. After twisting the wire together, cut it about a quarter of an inch away from the grip. Bend the cut end down and put it under the wrap of wire. Make sure it won’t catch on your hand when riding. Lock on grips make life EASY!! Remove the old grips by loosening the screw. New ones go on the same way except tighten. Because it comes with a new throttle tube, make sure you choose the correct cam for your bike. I just match the new ones up with what I had on already. This would also be a good time to spray Cable Life on the throttle cable. More Posts Back To Blog Page

Wrench Tip Wednesday: Grips Read More »

Scroll to Top