tech tip

Wrench Tip Wednesday: Installing Seat Covers

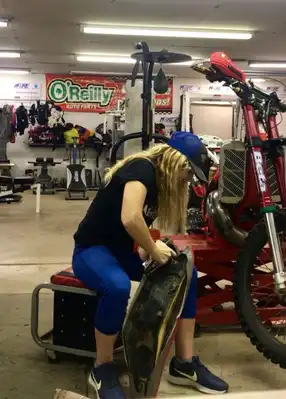
Wrench Tip Wednesday: Installing Seat Covers Did you know that getting rid of the stock seat cover with something rad automatically makes you faster? Haha kidding but it sure does make your bike look cool! I absolutely hate installing seat covers, no patience for that. First off, the old seat cover needs to be removed. Sometimes, getting the staples out can be a chore. I discovered the combo of a flathead screwdriver and needle nose pliers will do the trick. Once all stables are removed and old cover is off, turn the seat right-side up. Start at the front of the seat by pulling the cover over the end followed by doing the same at the back of the seat. The cover should feel tight to pull over both ends. Insuring it will help give a wrinkle-free finish. Once both ends are on the seat, check any logos on the seat are straight and centered. Be sure to also check the seams of the stitching, it should be sitting square. Grab the staple gun. Make sure it has the longer staples in it. Punch one staple to the front and the rear of the seat. Make sure you press the staple gun firmly down onto the plastic evenly or the staple will fire through the cover and cut a hole straight through it. Also, lack of pressure on the gun might keep the staple from penetrating into the plastic. If this happens pull the staple out and try again. Work your way from the front to the back of the seat pulling the cover tight and adding a staple to each side of the seat all the way down to the back. Keep checking that the cover is going on straight and snug to the seat base. I have a hard time trying to hold the seat, keep the cover tight, and stapling it all at once. If this seems to be your problem, I have found using two people does make it a lot easier. I also do not have a high-powered staple gun, just a standard one. More Posts Back To Blog Page

Wrench Tip Wednesday: Installing Seat Covers Read More »
Wrench Tip Wednesday: Chains

Wrench Tip Wednesday: Chains Chain and sprockets are easy to forget about but need to be near the top of the list for maintenance checks, like before every ride. Having a chain too loose, too tight, or wore out could be bad. When the chain is too loose it can wear out the chain slide prematurely or derail. A derailed chain can be super annoying and will delay the ride. A chain that is too tight can snap. When a chain breaks, it can damage the bike or even hit the rider in the back. Bet that will hurt. Majority of the time, this can all be prevented. Do a visual check, most people can tell just by looking at the chain if its too loose or too tight. A good rule of thumb is the three-finger method. Put three fingers on top of each other. You should get three fingers in between the chain and swingarm. If not, it’s obviously too tight or if there is still a lot of slack with your fingers in there, its too loose. So, adjust it. Loosen the rear axle. Tighten the chain tensioner bolt to loosen chain. Loosen the chain tensioner bolt to tighten the chain. Make sure the chain blocks are aligned properly. It ensures the truest reading when checking the chain. Before you tighten your axle, it’s a good idea to take a shop rag, fold it up and place it on the rear sprocket, all while spinning the wheel backwards. The rag will jam in the sprocket and chain causing the wheel to stop, tightening your chain, and butting the chain blocks up against the adjuster bolts. A bottle will also work. Tighten the rear axle up. Check the chain again. Inspect the condition of the chain and sprockets. It would be embarrassing to DNF over a master link falling off, chain breaking in half from it being so wore, or derailing because the sprockets are missing multiple teeth. When washing the bike, a focus point should be getting all the dirt and grit out of the chain. Spin the wheel around so you can hit every part of the chain. Then lube it. I prefer lube that doesn’t splatter everywhere when riding, I like the tacky stuff. If it splatters, that is more cleaning. My favorite chain lube is Bel Ray Blue Tac, it is super sticky. My dad likes to use Silkolene Pro chain. As always, it comes down to personal preference. So, if this is not on your list, add it, check it, lube it. More Posts Back To Blog Page

Wrench Tip Wednesday: Chains Read More »

Wrench Tip Wednesday: Muddy Gear

Wrench Tip Wednesday: Muddy Gear Winter and spring months can be soupy. The sloppy mud conditions can either be embraced with a smile or sitting at home sad. I choose a smile! So, what does a person do when their gear is no longer vibrant colors but instead is a nasty brown? Here are the options: Throw the gear away and buy a new set – this can get costly pretty quick and is wasteful. Show up to next race with gear already muddy. Psyche everyone else out about the conditions of the track. I strongly DO NOT recommend throwing the gear in the washer machine right away, unless you want to make your mom or wife/significant other mad. It will also not get all of the mud out and the gear will be stained. So, it will be a lose, lose. The best way to get the filthy gear clean. Lay all the gear out and power wash. Try to get all the mud out. Keep spraying until the water is no longer brown. Do not get so close that it ruins the gear. Once clean, put it in the washer machine and wash like normal. Its hard to avoid mud this time of year and increases power washing time by a lot! Playing in the mud is way better than sitting on the couch dreaming of your bike. If you forgot how to wash a dirty bike, refer to my blog post “Dirty bike = NO GOOD”. More Posts Back To Blog Page

Wrench Tip Wednesday: Muddy Gear Read More »

Wrench Tip Wednesday: Throttle Sticking

Wrench Tip Wednesday: Throttle Sticking One of the scariest “oh sh!t” moments to happen on the bike is the throttle to stick wide open. It is extremely easy to panic in that kind of situation but let’s talk about why it could happen. The throttle cable could be damaged or frayed. So, this needs to be on your list of items to inspect every time maintenance is done. Double check how the cable is routed and what it is next to. Sometimes the cable can get pinched between other things on a bike and it can be caused by a simple wreck. Debris can be caught between the throttle tube and the handlebar. Check the throttle housing for debris. If the cable is applicable, lube it. The throttle slide could be stuck in the carb. The bike could have an air leak: Broken or cracked reeds Loose hose clamps Damaged hoses Loose spark plug Carb insulator Bad gaskets Bad crank seal Crack or damaged head. Some of the things that can go wrong are not preventative but if a person thoroughly inspects their bike often and makes detailed notes in their “diary” a throttle stuck wide open can be prevented majority of the time. Sometimes, sh!t happens…. You might have inspected the cable and everything looks good but you get to experience one of those scary moments. Some riders are so in tuned to how their bike is running and acting and can tell the throttle is sticking before its too late. If you are one of these lucky riders, stop and figure out why it is sticking, fix it. What do you do if you are not so lucky? Stay calm and try not to panic. Riders who do not run a Rekluse, needs to pull in the clutch, apply the brakes and hit the kill button. Get the bike to shut down. If you have a Rekluse, lock up the brakes and try to push the kill button or choke it. If you are not capable of doing either of those, jump off the bike. Do not have yourself on the bike straight towards the tree, cliff, or whatever obstacle it might be. I know, easier said than done but be aware a throttle stuck wide open can happen to anyone. Point is, do not forget to check your cables. Keep dirt out of the carb. Be observant. After every race or ride, inspect the ENTIRE bike. Most manufactures offer a maintenance schedule, it is a good idea to follow their suggestions. Enjoy the ride without a panic attack. More Posts Back To Blog Page

Wrench Tip Wednesday: Throttle Sticking Read More »

Wrench Tip Wednesday: Fuel Filters

Wrench Tip Wednesday: Fuel Filters Fuel Filters…..an important, cheap item that is often forgotten. The purpose of a fuel filter is to help the bike run cleaner. CHEAP & EASY TO INSTALL!! A good rule of thumb, be cautious where you buy your gas. That gas station right down the road no one goes to, most likely does not have fresh, good quality fuel available. Sometimes, bad fuel may only be a factor, and other issues may still linger. Fuel tanks can get debris in it easily. A fuel tank can already have fine particles in it from getting the holes drilled to make it fit on the bike. Or even putting gas in your bike allows dirt a chance to get in. Where does the gas go after it leaves the lines? It goes to the carb. Dirt in carburetor is not good! It can cause the jets to get clogged or cause the float to stick. Pretty much, your bike will not run or not run very well. EFI bikes, where does the gas go (no carb)? Straight to the injector. Getting dirt in that, can be expensive! Simple preventative tip, install in inline fuel filter. Installing an inline fuel filter is easy, refer to the picture. They generally cost around $4 and work effectively. A fuel filter can get clogged, so add that your list of items to visually inspect. Also, check the fuel lines often, make sure they are still secure and not rubbing on anything, forming holes. Short, sweet, and to the point! Install a fuel filter and save money later. EASY PEASY! More Posts Back To Blog Page

Wrench Tip Wednesday: Fuel Filters Read More »

Wrench Tip Wednesday: Winter Riding or Store It

Wrench Tip Wednesday: Winter Riding or Store It It’s pretty evident winter has made it presence here in Missouri. Although, blizzards are rare and extreme negative temperature don’t happen often, some people put there bike up in the winter but a few “crazy” people try to ride. Two questions, how do you prep a bike for winter storing or what is it like to ride. If you don’t plan on riding during winter, follow these steps so hopefully you will have less headaches come the first nice day in the year. First, give the bike a good wash, like really good!! Scrub it!! Love on it!! Gas goes bad in 4-6 weeks so add a fuel stabilizer to help it. Run the bike for a few minutes, that way the fuel can go through the system. Turn the fuel off and then drain the carb. If it is an EFI bike, try really hard to keep fresh gas in it. Change your oil, important because it lubricates. Make sure the coolant is full and double check that is rated for subzero temperatures. Disconnect the battery. This is extremely important for EFI bikes especially. Bad battery, low voltage, and ECU do not mix well together. It would not hurt to go ahead and throw it on a battery tender. To the brave souls who plan to bare the cold temperatures and embrace winter riding, prepare yourself. First off, make sure you have the proper attire for cold weather riding!! I like to layer and use a Fly cold weather jersey. Or in extreme cases bibs and a Carhartt coat! Now what to expect with the dirt bike. It will most likely be hard to start. Don’t freak out about this but also do not continue to crank the electric start. Make sure the gas is on and have it choked. Sometimes it helps to lay it over on its side and let gas run out of it. Obviously, the last few steps are for non fuel injected bikes. Poor quality coolant can freeze. Or what about that one race, water was poured in to get by, did it get forgotten about? Another reason why keeping track in your dirt bike diary is important. The suspension might not act the way it normally does when you start to ride. Fork fluid needs to get warm, so do not go adjusting the clickers or cussing it right away. Ever heard of a cold seized engine? This is very possible in our area. A cold seized engine is similar to running a bike with no oil. The bike needs to be properly warmed up. Start it up but do not go revving the crap out of it immediately. Keep the RPMS low so the oil can heat up. Sometimes the clutch will not be working properly right away. POINT IS a cold bike does not act the same as warm bike, so relax and let everything get warm. More Posts Back To Blog Page

Wrench Tip Wednesday: Winter Riding or Store It Read More »

Wrench Tip Wednesday: Set the Sag

Wrench Tip Wednesday: Set the Sag WARNING, I am not a suspension expert but understanding how it works is something that interests me. Having the bike properly set up helps the overall rideability of it. I’m not saying you have to go spend a bunch of money to get your suspension tuned but suggesting to at least have your sag is set correctly. Doing so insures the correct size springs are in your bike along with allowing for better overall handling. The sag can be decreased to make quicker handling but will reduce high speed stability, this is good for tight courses because it can help improve steering accuracy. It is also recommended to do so in muddy conditions to handle weight build up. Increasing the sag, improves stability in high speed and sandy tracks. A spring too soft will ride high in the rear because it needs preloaded more than a stiffer spring. A stiffer spring will have a lower initial ride height but will feel firmer on bumps. Static sag is a measurement of the bikes distance that the rear end of the bike settles while on the ground, but only under the load of its own weight (no rider) and is checked before and after rider’s sag. For 125cc and above, the number should be 35mm +/- 5mm. Rider’s sag is the distance that the rear end of the bike settles when on the ground and under the load of the rider’s weight in full gear. This number should be 105 mm +/- 10mm. Linkage bikes should be 95mm – 105mm range and KTM PDS should be 105 mm – 115mm. If the measurements are above range values you need a softer spring. If it is below, then you need a stiffer spring. The most convenient and easiest way to measure is using Motool Slacker, a digital scale. Center the tool in the middle of the axel and always place the clamp in the exact same place every time. Put the bike up on a stand with both wheels off the ground and measure the static sag. Then, have the rider hop on in full gear and in “attack position”, standing not sitting in a granny position. Bounce up and down a few times and check the number. Just like anything, there is different way to do everything. I have heard some people like to stand up and then sit down naturally to measure the riders sag. Other people check both standing and sitting and do an average of the two. Everyone is entitled to their own opinion and this is just what I have learned over the years from experience and talking to different people. Have the rider get off and check the static sag measurement. Don’t have the digital tool? I hope you like math. A measuring tape can be used, preferably metric. Put the bike on a stand, with the wheels off the ground. Measure the distance from the rear axle to a vertical point on the rear of the bike. This is L1. Put the rider on the bike in full gear, standing, compress the rear suspension and slowly release back up. Measure between the two points rear axle to a vertical point on the rear of the bike. This is L2. Lift up on the rear slightly (about 20mm) and slowly release it downward, particularly at the end. If there was no friction it would continue to drop a bit more. Measure between the same two points. This is L3. The difference between lifting up L2 and pushing down L3 is caused by friction. If it is more than 4mm or 5mm the linkage needs attention. Sag is calculated by averaging L2 and L3 subtracting it from fully extended. Riders sag = L1 – [(L2 – L3)/2] As I mentioned above, if your linkage bearings are seized up, this prevents the rear shock working properly. Therefore, you will not get your sag set and your shock will not be moving like it should, you will be in for a rough ride. Keep up on your maintenance and your dirt bike experience will be much better. If further assistance is needed with setup Jim at Shock Zone Suspension would be a good place to go. Shoutout to the customer that got lucky enough to be in the picture to make sure I did not fall! haha I wanted to give a general idea of what it is like to check it. More Posts Back To Blog Page

Wrench Tip Wednesday: Set the Sag Read More »

Wrench Tip Wednesday: Greasy

Wrench Tip Wednesday: Greasy When it comes to grease, use it like you have an endless supply. Keeping the bearings lubricated with an amble amount of grease can extend the life of them. This simple task will make them last longer and in the long run it will be cheaper. Most new bikes come with grease on the bearings, but normally it is not a sufficient amount. While the bike is still brand new, we like to take it apart and add additional grease to the steering head, wheels, linkage, and swingarm bearings. My #1 rule of thumb is, anything that makes parts last longer, is worth it. Bearings are a moving part with lots of friction. Think about the times you’ve ridden your bike in sand, mud, water, and other outside elements…that’s like every time you ride, right? Packing the bearings with waterproof grease protects the bearings from the elements and can also reduce the amount of friction. Not enough grease will allow water and dirt into the bearings, which will make it go bad fast!! Check the bearings often. Every time you prep the bike for a race, check for free play by spinning, twisting, or agitate each part side to side to feel for notches, restricted movement or excessive free play. Failure to replace wheel bearings when needed or keeping them greased can result in needing to replace the hub. That can be costly so be sure to keep an eye on it. Your bike have linkage suspension? Be sure to check that often otherwise your rear suspension can seize up. Swingarm bearings gone bad can also affect how the bike handles in the rear. Point is, do not be afraid to put some good waterproof grease on the bearings.. A LOT OF IT! More Posts Back To Blog Page

Wrench Tip Wednesday: Greasy Read More »

Wrench Tip Wednesday: Too Tight to buy Oil

Wrench Tip Wednesday: Too Tight to buy Oil Man, dirt bike specific oil is high! Can’t I use automotive oil and just change it every time? My answer is no but you do what you want. For starters, lets talk about the oils journey in the engine. 4 strokes use a recirculation oil system. Oil is forced into the filter by an engine driven pump. The filter picks up large particles that should not be there. After it goes through the filter, the oil enters the oil pump and then fed throughout the engine. Minimizing heat and friction build up is important. Low quality oils fail at doing this. The next concern is premature wear. Automotive oil lacks cleanliness or detergent. This can increase deposit accumulation resulting in power loss. Automotive oil can increase clutch slippage in bikes with wet clutches. Even bikes with split cases, using the cheap oil in the clutch side can cause faster wear to the clutch plates. In a years’ time, more money will be spent using the “cheaper oil” due to more frequent oil changes, oil filter replacement, and premature engine wear. So, I recommend sucking it up and spending the extra money on dirt bike specific oils. In the end, it really is cheaper even if the price on the bottle does not look that way. BETA RIDERS – Beta recommends Motul in their bikes, Transoil on the clutch side and 7100 10W-40 on engine side. Motul 7100 4T runs cooler than most oils and will work well in 2T clutches. Sherco has a wet clutch (meaning the cases are not split and the clutch and engine oil are in one spot), so make sure you are using a wet clutch oil such as Bel-Ray Thumper. More Posts Back To Blog Page

Wrench Tip Wednesday: Too Tight to buy Oil Read More »

Wrench Tip Wednesday: Dirt Bike Diary

Wrench Tip Wednesday: Dirt Bike Diary Do you write a diary about your dirt bike? If not, you should and not just write about how much you love your bike. You need to track stuff, regarding hours, conditions of what you are riding, work done to the bike, etc..? Some riders tend to wait until something fails on their bike before fixing it. Wouldn’t it suck to pull up to the start and all of sudden your clutch does not work… Something to ponder on How many legitimate hours are on your bike? The only accurate way to know is to use a hour meter vs mentally keeping track. The problem with mentally keeping track is, did you really ride for 2 hours or was it really 30 minutes ride time and talk for the rest. Hour meters do not lie. There are two types of hour meters: -Wireless, which runs off engine vibration. When transporting a bike, sometimes a meter can vibrate and add hours to it. Now, PC Racing makes a meter that can be locked when not riding. -Wired, the wire attaches to the coil or spark plug Most of our bikes have wireless ones on but we do still have a few wired ones on and no complaints on either. Now that you are properly tracking your hours, it is time to talk about the diary. EVERYTHING needs to be wrote down! Dates, current hours, what kind of oil used, what has been changed and why, maintenance, literally every little detail regarding the bike. It is the most accurate way to keep track of work done. All manufactures come with a maintenance manual, it shows at “X” number of hours certain things should be checked or even replaced. An example is, Beta recommends on 2 strokes around 65 hours it might be time for a top end. Writing everything down sounds like tedious work but in the end, it takes less time doing that than the time and money wasted from a mechanical DNF. More Posts Back To Blog Page

Wrench Tip Wednesday: Dirt Bike Diary Read More »

Scroll to Top